Thursday 30 October 2014

Design number 1 new Elizabethans


I have recently been looking at Heart shaped designs new and old. I have came across these images. 

Queen Elizabeth I
by Unknown English artist
oil on panel, circa 1588
38 1/2 in. x 28 1/2 in. (978 mm x 724 mm)
Transferred from British Museum, 1879
Primary Collection
NPG 541
Queen Elizabeth I, by Unknown English artist, circa 1588 - NPG 541 - © National Portrait Gallery, Londonhttp://www.npg.org.uk/collections/search/portrait/mw02077/Queen-Elizabeth-I?LinkID=mp01452&search=sas&sText=queen+elizabeth&wPage=0&role=sit&rNo=8
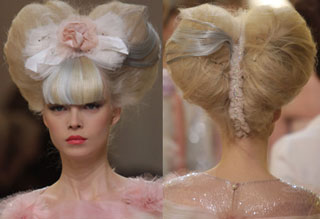
Chanel Couture Spring Collection 2010 
http://media.onsugar.com/files/2010/01/04/2/192/1922153/656cd56d9a847401_Chanel-Haute-Couture-Spring-Summer-2010.jpg

Seeing these images inspired me to go on with my current design. 


 Today I practised one of my looks that I designed for the new Elizabethan project. When designing this look I was thinking about bringing a modem goth look to it! This look has 2 pads underneath so I will need 4 for assessment. I like the way I placed the curls as I think they look like flowers. I feel like this look needs some small burgundy roses sitting in between the curls to add to the gothic effect.


Sunday 26 October 2014

Figure of 8


   This is my experiment with crimping hair using a hair pin and straighteners. To do this you would need to grab a small section of hair, place the pin (bottom down)  at the root and begin wrapping the hair between the two 'legs' creating a figure of 8. when at the end of the hair you would use a second pin to secure, then use straighteners to set it.
when it is cooled down you would release the hair and should end up with a result similar to this.

I first tried it on a dolls head but found it came out much smoother on one of my class mates.


DOLLS HEAD.


Curls and crimping

Queen Elizabeth I, associated with Nicholas Hilliard, circa 1575 - NPG 190 - © National Portrait Gallery, London


Queen Elizabeth I
associated with Nicholas Hilliard
oil on panel, circa 1575
31 in. x 24 in. (787 mm x 610 mm)
Purchased, 1865
Primary Collection
NPG 190
http://www.npg.org.uk/collections/search/portrait/mw02074/Queen-Elizabeth-I?LinkID=mp01452&search=sas&sText=queen+elizabeth&OConly=true&role=sit&rNo=4
Curls were very popular in the Elizabethan times.
This is a portrait of Queen Elizabeth the first displaying curls in her hair. 
Contemporary curls-
These pin curls remind me of the Elizabethan look but also are modern due to the placement of the curls. 


http://www.myhautedame.com/tag/modern-pin-curls/


 This is my practice of crimping and curling. I quite enjoyed crimping as it created a texture similar to my own and also made the hair mold-able.


Buns and plaits part 2

In Helen's lesson we practiced our buns and plaits more but this time we incorporated ribbons,
With my hair styles i created i experimented with twisting the hair around the ribbon and tying it to see what sort of styles i could create.


This first look i created by twisting parts of the outer hair around the ribbon then tying it. I really like  how the first picture looks. unfortunately the hair in second picture did not match the other side. So i would need to work out how to make them both match.


 I quite like this hair style. If it was more neat.
I like how the hair has created a twisted swirl.again i created this by wrapping bits of hair around the ribbon.

otherside


front


---------------------------------------
I created this look by wrapping big chunks of hair around the ribbon then creating a 'beehive' in the back.
front view


top view.


--------------------------------------------------------------


I created this look by loosening the ribbon on the previous look. 


---------------------------------------------------------


  look 4


------------------------------------------------------------


 This is one of my favorite looks as it looks pretty and complex. I created this look by tying the ribbon round the head and loosely wrapping hair around the ribbon to created the fringe swooping effect. surprisingly no pins were needed for this look.


Sunday 12 October 2014

Buns and Plaits Part 1

In Our lesson with Lottie we focused on buns and plaits. We're starting from the basics to get everyone up to the same level as some have never had experienced in hair before. 
To start we focused on the basic plait.

How to plait

  1. Take a desired section of hair and split hair into 3 parts
  2. start by taking the furthest right section of the hair then cross it over to the middle.
  3. next take the furthest left section of hair and cross over to the middle 
  4. continually do this in turn and eventually you will end up with result displayed below.

This is my end result.


I found this fairly easy as I learned this as a child.


How to do a french braid 

  • start by parting your hair down the middle (nose to nape) , tie one section out of the way.
  • take a smaller section from the front and part that into 3 sections. 
  • start of as you would a normal plait, once you have passed the hair over twice begin to add other sections of hair from underneath.


I found this quite difficult as I have always but I am going to start practicing at home to better my skill.


How to do a fishtail braid

  • start by sectioning ponytail into two pieces.
  • take a small section from the outside of one section and pass it over to the other.
  • holding that hair in the other section, take another small piece of hair from the other section and pass it over.
  • eventually you will end up with a fishtail braid.


I found this quite easy as I was used to doing them on myself.


How to do a bun without a bun ring 


  • scoop hair into a high pony and secure with a hair tie. 
  •  split pony tail into 4 sections 
  • take a section and backcomb the inside. smooth over the top side with a brush.
  • take said section and begin to loop hair around finger to create a circular shape and pin down.
  • do that to all 4 sections then start to secure the gaps together with pins.  


I found this quite easy all though mine wasn't perfect as we didn't have a lot of time.